
Photographing a Solar Eclipse
Obviously I focus a lot of my photography time on portraits, but every once in a while (as often as I can!) I steal some time for some personal projects. One of my most treasured was the Total Solar Eclipse that happened on August 21, 2017.
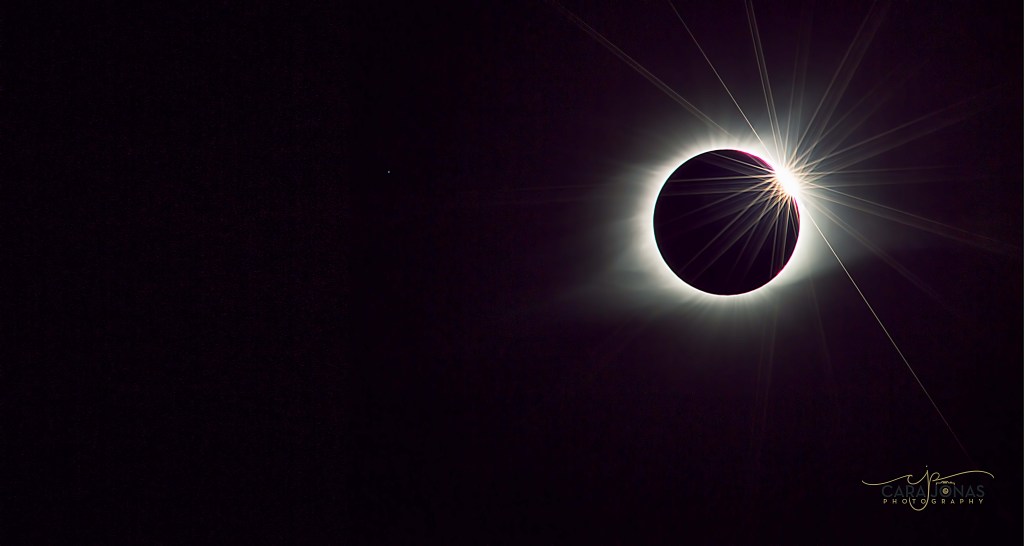
I’ve never written a ‘How To’ column but I’ve gotten so many requests after I posted my Eclipse shot (‘Diamonds in the Sky’) that I felt like I needed to share the lessons I learned while making this image.
First, I have to say that there is always a certain amount of luck responsible for capturing an amazing image of fleeting, natural occurrences, life events, or wildlife. With durations of only seconds or minutes, sometimes it just comes down to pressing the shutter at exactly the right time, regardless of your settings or prep. If you don’t like the word ‘luck’, we can call it ‘timing’. Either way, there are always some things out of your control in these scenarios. Allow for that, forgive yourself for what you can’t plan and manage. But manage the hell out of the rest of it…
The Early Bird Gets the Worm
GET THERE EARLY: The last thing you want to do as you are trying to catch an epic pic is run to the location, scramble to setup your gear, and then start snapping. Give yourself time to scope out the best spot, setup your gear, breathe. You need a clear head because something will go wrong, and if you are still pumped up from running to the scene chances are you will not be able to think clearly and pivot to another approach. For this eclipse pic we arrived at the location on Saturday (the eclipse was Monday). This gave me one day to unpack, setup, and settle in, and one full day to practice with the sun in pretty much the exact location it would be during the eclipse. I fined tuned my exposure quite a bit on that practice day so don’t discount the value of getting there early. For other real life scenarios this may mean stopping by a location prior to the day of an event or scouting venues for shoots before you have a client with you.
Study Up
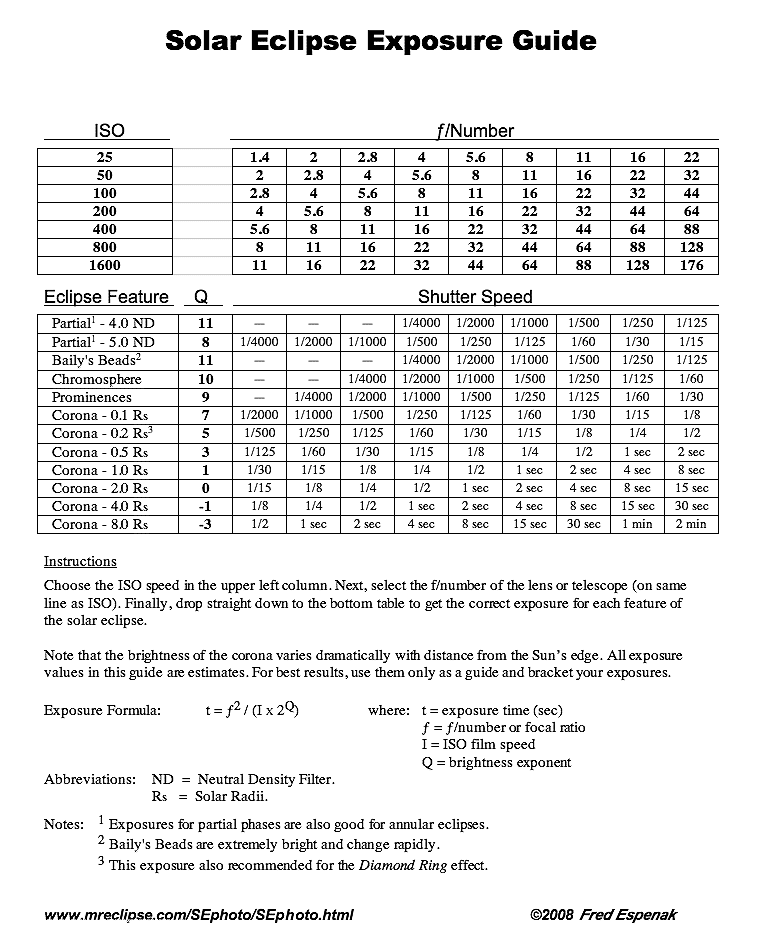
EDUCATE YOURSELF: Chances are someone, somewhere has done what you are trying to do. Find them, read their guides, educate yourself on whatever it is that you are trying to capture. I did not just stumble into the techniques and exposure I used for this shot. I read hundreds of articles and watched many YouTube videos. One of the best guides for eclipse photography is Fred Espenak also known as Mr. Eclipse. His website covers exposure, focal length, and many other practical tips specific to eclipse photography. One of my favorite eclipse photography videos was done by Rocky Mountain School of Photography and it was a great primer to solar photography in general and has provided inspiration for my 2024 eclipse planning (I see a telescope and tracking rig in my future!). Do your own research and never discount the effect that education will have on your final outcome.
Dress Rehearsal
PLAN AND PRACTICE: I put these two together because you need to practice your plan. It’s not enough to just plan to do certain things. Don’t forget that you are going to be experiencing a potentially once in a lifetime, emotional event. Experiencing it, not just taking photos of it. You may get emotional, you will absolutely be amazed. Are you going to be able to execute your plan without thinking about the details? One of the articles I read while preparing for the 2017 solar eclipse suggested running around the block and then trying to take a photo. That gives you an idea of how adrenaline can affect your ability to think and your fine motor skills. Trust me, I experienced that while getting this shot. There was some screaming and dancing and maybe some tears as I saw what I was capturing on the back of my camera along with witnessing what was happening all around me. If you’re a note taker, write things down. Have something concrete to fall back on if you find yourself panicking.
Second Nature
KNOW YOUR EQUIPMENT: And know how to use it for whatever scenario you’ll be in. For my eclipse shot I took the advice of the experts I found during my #2 activity above and shot in Live Mode. I locked in my focal length and focus the day before the eclipse and then double checked it the morning off the eclipse when I setup my gear. I used a three step process to finalize my lens settings. I first located the sun in Live Mode at 150mm. Then I zoomed to 500mm and used Live Mode zoom to view the edge of the sun. I switched my lens to Manual focus and used my zoomed in Live View on the back of my camera to sharpen the sun’s edge. Finally, I locked my focal length and focus rings with gaffer tape. Remember, this was all done the day before the eclipse as part of my prep. All was still clear and sharp the morning of the eclipse so those settings were not touched again until the eclipse was over. I hadn’t invested in a tracking or GPS tripod mount so I was on my own to manually adjust my tripod every 10 minutes or so. There was a point where I managed to allow my ball head to drop and I lost the sun….gasp! If you’ve ever tried to find something as small as the sun in a totally black sky (solar filter) zoomed in at 500mm, you know my heart skipped a few beats there! I panicked for a split second and then re-grouped. Thankfully I had plenty of time before the eclipse and was able to recompose my shot. I made two adjustments at that point: I changed my ballhead friction to as tight as it would go and I recomposed every 3-4 minutes so that I wouldn’t have any issues as totality neared. Side note: I actually forgot to turn off my lens IS/OS because I hadn’t practiced it and hadn’t written it on my cheat sheet (see #3 above LOL).
Make Your Equipment Work for You
AUTOMATE: I knew based on my research that I was going to have two dramatically different exposures for the partial and total eclipse phases. It was time to use my C1 and C2 modes on my camera dial! This allowed me to fine tune my partial exposure using the sun the day before and set my camera settings at C1 for the partial eclipse. My C1 settings ended up at: ISO 200, f/8, 1/320 with a 7 stop exposure bracket. I didn’t really need the exposure bracketing for the partial phase but if it had gotten cloudy at our location, that might have saved my partial shots. I would definitely setup that way again. I used Mr. Eclipse’s exposure guide as my starting point for totality. I knew I wanted to use f16 to allow a chance of getting a sunstar, so I setup my C2 dial at ISO 200, f16, 1/8 with a 7 stop exposure bracket. Then all I really needed to do was to remember to remove my solar filter and switch my dial to C2 as totality started. I also found a great Solar Eclipse timer app that allowed me to track the events leading up to and during totality. This was great because it includes an embedded reminder to remove your glasses (and your solar filter!). And it automatically geolocates to give you specific times based on exactly where you are setup.
Plan B through Z
BACKUP PLANS AND MACGYVER WHEN NEEDED: Do I need to say that I brought extra camera batteries (Live Mode eats them!), extra memory cards, or a backup camera body? Well, of course I did! And despite my harping about planning in #3 above I didn’t decide to head to totality until about a month before the eclipse. This meant that most of the glass solar filters were already sold out (and I didn’t want to spend that much on one anyway)! So I bought a simple solar filter sheet and made my own out of my lens hood, cardboard, and more gaffer tape. I also took an array of goodies with me in case I needed to make do in the field (many of these items are already always in my ‘Oh Sh!t’ bag): more gaffer tape, a small toolkit, a small Swiss Army knife, a few carabiners, backdrop clamps, an extra tripod plate, a white towel to keep my camera cool (which also came in handy as a photographer’s scrim to shield my eyes as I was using Live View), and extra solar filter film (left over from making my DIY version). I didn’t really need any of my emergency kit but it was there just in case. I actually was able to share some of my filter sheet with a young photographer at the event to allow him to photograph the phases leading up to the eclipse. He was thrilled. Give back where you can!
The Final Result
If you’ve read this far you’re probably thinking, ok already-just tell me what gear you used and what your settings were! Jeesh, you guys are sooooo pushy! Just kidding…. This shot was taken with a Canon 5d Mark III and a Sigma 150-500mm f5-6.3 lens at 500mm and f16, 1/20, ISO 200 with a Thousand Oaks Optical solar filter on a Manfrotto 058B tripod with a Manfrotto 468MGRC2 Hydrostatic ball head.
Thank you for reading and I hope you found this information helpful and use it as you plan your next shoot. We’d love to see and hear about any success stories from using these tips in the comments below.
Do you want to add any of this gear to your kit or just find out more? Affiliate links are below for all of the products that supported me on that day. Note: the lens I used has been replaced with a newer model Sigma 150-600mm f5-6.3 which is also linked below.
[vc_row][vc_column width=”1/3″][vc_column_text][/vc_column_text][/vc_column][vc_column width=”1/3″][vc_column_text][/vc_column_text][/vc_column][vc_column width=”1/3″][vc_column_text][/vc_column_text][/vc_column][/vc_row][vc_row][vc_column width=”1/3″][vc_column_text][/vc_column_text][/vc_column][vc_column width=”1/3″][vc_column_text][/vc_column_text][/vc_column][vc_column width=”1/3″][vc_column_text][/vc_column_text][/vc_column][/vc_row]